INTRODUCTION
1. Purpose
2. Updates
3. Inspection
4. Warranty
5. Disclaimer
Part 1: Theory
1. About Chi Generators
1.1. Life Force and WCG
1.2. Construction of WCG
1.3. Purpose of the WCG
1.4. Theory of Operation
1.4.1. General Remarks
1.4.2. Characteristics of Life Force
1.4.3. Life Force and Hyper Spaces
1.4.4. Operation of WCG
1.4.5. Chi at any Distance
2. Radionics and Orgone Generators
2.1. It is Magick!
2.1.1. The Trend-Link
2.1.2. The Target-Link
2.1.3. Life Force
2.2. Radionics and Magick
2.2.1. Structural Links and Life Force
2.2.2. There’s Magick in Radionics!
2.2.3. Radionics, Orgone, and Magick
2.3. How Old Time Practitioners
Have Been Generating Life Force
2.4. The Structure of the Radionics Device
Part 2:
The Orgone Radionics Equipment
and Accessories
1. The EPG 1100 ET
Operation of the EPG 1100 ET
1.1. Setting Up
1.2. Testing
1.3. Setting of the Pulse Frequency
1.4. Targeting
1.5. Action at a Distance
2. Attachments: The Power Boosters
2.1. The Power Booster (PB 2000)
2.2. The Power Booster with Transfer Disk
2.3. The Potency Booster PBTBH 2000
3. The RAD 2000 Orgone Radionics Device
3.1. General Description
Diagram of the RAD 2000
3.2. Operation of the RAD 2000
3.2.1. Setting Up:
3.3.2. Setting of the Rate:
3.4.3. Targeting Example:
Success in Business.
4. The RAD 2400 DL
Low Pulse Orgone Modules
and Brain Frequencies
5. The RAD 2400 HD
6. The FPG 2400
7. The LPOG 2400 DL
8. The LPOG 2200 HDS
Part 3: Practical Uses and Hints
1. To Increase the Power of the EPG
2. To Improve Energy Transfer
3. Send Energy to Yourself
5. Use of the EPG or EPU to Energize Water
Part 4:
A Step by Step
Introduction to NCP
Introductory Note
Neuro-Cybernetic Programming
Using Your Equipment from HSCTI
1. The Beginning — Self-Help,
Trust in Yourself!
1.1. Feel the Energy Output
1.2. Feel Differences in the Energy Output
1.3. Feel the Energy Output at a Distance
1.4. Energize Yourself with Structural Link
1.5. Energize Distilled Water
1.7. Self-Programming
2. Intermediate – Practice of NCP
2.1. Energy Transfer with the RAD 2000
2.2. Intermediate Self-Programming
2.3. Project Chi at Another Person,
2.4. Relax Another Person
2.5. Activate Another Person
2.6. Establish a Business Success
Program for Yourself
2.7. Relationships
2.8. Communications Management
3. Advanced Methods
3.1. Intuition, Intelligence, Creativity
3.2. Tuning into People at a Distance
Using Structural Linkage (ESP)
3.3. Meditation Practices
3.4. Active Visualization Practices
Appendix:
The RI 2400 CD
Radionic Program
Radionics Interface Setup
Folders
The Program
Image Boxes
Text Boxes
To use the program as an interface
with a RAD 2400 DL or RAD 2400 HDS
Conversely, to use the program as an
electronic stick pad of your
RAD 2400 or RAD 2400 HDS
Other:
The Orgone Radionics Equipment and Accessories
1. The EPG 1100
ET — The Edge Power Generator 1100 Energy Transmitter
The EPG 1100 ET is the basic Welz Chi Generator, or orgone generator.
Strictly speaking, the EPG 1100 ET is not a full-fledged radionics
device: it has no tuner part to establish equivalent structural links.
The radionics experts call these links radionic “rates”, some call it “frequencies”.
However, you can use it for many tasks that you can do with a radionics
device. Instead of specific rates, you use structural links of another
type when working with the EPG 1100 ET, such as archetypal symbols, photos,
and other magickal utensils.
The EPG 1100 is powered by a pulse generating unit. This
unit includes a Voltage regulator. This regulator eliminates the
“60 Hz ripple effect”, thus making the EPG 1100 much better suited to energize
your body with chi energy.
The diagram of the EPG 1100:
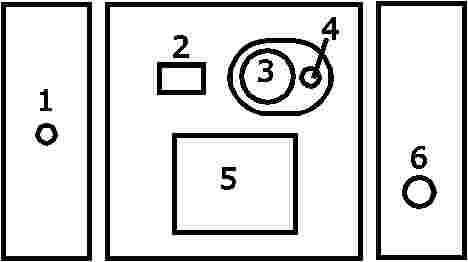
(1) Power Jack:
Attach a Wall Transformer that has a DC output of 12V and 100
to 300mA. Positive Tip.
(2) On-Off Switch
(3) Frequency Knob
You may set the frequency between approximately 1/2 Hz (one blink
every two seconds) to a maximum of 900 Hz. Most of the dial is for
low frequencies between 0.5 Hz and 20 Hz, i.e., you see the light blinking
for most of the range of the dial.
(4) LED (Light Emitting Diode)
This light is blinking when the device is operating. When
you set it to very high frequencies, the light will be perceived as “solid”.
(5) Well
A stainless steel sheet onto which you can put filter cards,
transfer devices, and other links to desired effects.
(6) Output Pipe
You may point the output pipe toward yourself (up to several feet away).
You may also slide the booster part of a PBT 2000 (Power booster with Transfer
Disk) over it to effectively double the output power of the EPG 1100 ET.
In this case, carry the transfer disk on yourself to energize yourself
with chi energy.
Operation of the Standard Welz Chi Generator (EPG 1100 ET)
1.1. Setting Up
(1) Plug the DC plug of the Power Adapter into the power jack of the
device.
(2) Plug AC-DC Power Adapter(s) into a wall outlet.
(3) Now the LED (Light Emitting Diode / Control Light) should be on,
either blinking or continuous. Turn the knob on the EPG or exterior
module. The LED blinks very slowly when the knob is turned all the
way to the left. As you turn the knob to the right, the blinking
speed increases until it appears as a solid light.
1.2. Testing
To test the output of the Welz Chi Generator, hold the palm of
any one of your hands in front of the device, about one-inch from the output
pipe. The front of the EPG 2000 is the side opposite to the side
where you see one jack, one LED, and one knob. The output of the
1100 ET is the pipe.
You may feel a cool breeze or warmth. More than 90% will
feel this immediately. If you are among the other 10%, it may take
you a bit of time — perhaps even training — to get the feeling of the output.
You may also hold the output pipe on the front end of the device approximately
one inch in front of your forehead, between your eyes. Both areas,
your hand and the forehead, are very sensitive to life force.
Important Note: Some of our customers complained after
several weeks that they could not feel anymore the energy as they did when
they first received the chi generator. This drop in subjective feeling
is the result of saturation of life force. When saturated, you will
not draw as much chi as when demanding chi. As you feel only the chi as
it enters your body, you do not feel much when your body does not demand
any additional chi energy.
1.3. Setting of the
Pulse Frequency
You set the pulse frequency by turning the knob in the back of
the machine (the EPG 2000) or on top of the device (the EPG 1100 ET).
The red light blinks at low settings. The lower you set the pulse,
the more relaxed the energy feels. Higher settings activate.
With practice, you will learn how to feel the difference in pulse
speed and to set the pulse for each of the tasks for which you use the
machine. A good rule of thumb is to have a setting where you see
a very rapid flickering of the control light.
Hint: Get a “feeling” of pulse speeds by setting different
speeds and holding your hand in front of the device. Make notes of
your feelings and the position of the dial.
1.4. Targeting
With the orgone generator set up, you can now go on to make it
work for you. This you can do by setting the attachments (“filters”
and/or radionics devices) and structural link with your target onto the
well of the machine.
You may also work without a filter and simply transfer life energies.
If you choose yourself to be the target (e.g., to make you more effective
in negotiating), the structural link may be a photo of yourself, or some
of your hair glued on a card. In both cases you need to establish
a mental connection between the “witness” (photo, hair, etc.) that you
put onto the well area and the target itself (you). You find an explanation
in the course “Magic of the Future.” More reliable is a link using
a power booster with transfer disk (PBT 2000). This accessory not
only strengthens the output of the EPG, but the transfer disk is also is
a unique and reliable link. In this case, simply carry the transfer
disk on you. You need not photo. If you target another person,
you may use a structural link (hair or photo) that connects to him or her.
In that case you use the structural link to influence this person.
The filter you choose depends on the action that you want to
happen. The filter sets the general trend. It determines the
type of energy that will surround the target during the operation.
A variety of filter attachments are available from HSCTI. You can
also custom design filters for any purpose. See the last part of
this manual for a step-by-step introduction.
1.5. Action at a Distance
(Something that you should already know!)
Perform the following experiment: Take a piece of paper.
Draw something on it, or simply scribble something on it. This drawing
should be not larger than 2 x 2 inches. Make two copies of the drawing.
Throw away the original. Put one copy in front of the output of the
Welz Chi Generator. This copy serves as a structural link.
Put the other copy on a table. Now hold the palm of one of your hands
1 to 2 inches above the drawing on the table. Feel the energy.
Most persons feel the energy as gentle warmth, sometimes heat. Others
feel it as a slight breeze or as a tingling sensation. More reliable
than two identical papers is a power booster with transfer disk.
2. Attachments: The Power Boosters
2.1. The Power Booster
(PB 2000)
To increase the output of any Welz Chi Generator, you may attach
a Power Booster. Like all power generating units, the Power Booster
is made of orgonite, the new orgone accumulating material that was developed
by Karl Hans Welz.
Slide the power booster over the output pipe in front of the
EPG 1100 ET. The long pipe-end points to the front, away from the EPG.
2.2. The
Power Booster with Transfer Disk (PBT 2000)
This is a Power Booster that comes with a Transfer Disk.
The Transfer Disk will give you assured smoother transfer of life energy.
As the power booster it is made of orgonite and it has a built-in structural
link that connects it with its power booster. Attach the booster
part the same way as outlined under point 2.1.
To test for transfer, put the transfer disk on a flat surface
and hold the palm of your hand (any hand) above it.
If you work with a FPG or radionics device, you may put the power
booster onto the output area, usually the stick pad (rubbing plate) or
the output well. The radionics device needs to be in front of the
EPG or EPU, i.e., within its orgone field.
Important: Each Power Booster with Transfer Disk (PBT 2000)
is connected with this Transfer Disk only. There is no replacement
for a Transfer Disk, should you lose it.
2.3. The Potency
Booster PBTBH 2000
A Power Booster that features a special built-in structural filter
designed to increase male potency. Chi is life energy. With
specific filters, vital chi energy is directed to the sexual organs for
invigoration and increased sexual energy. For best results, carry
the transfer disk always on you. Like the PBT 2000, you may attach
additional trends to it and transfer them to yourself.
Disclaimer: The device is operating with body energies,
or chi. Consequently it has no therapeutic value whatsoever.
To treat impotence, see your doctor!
3. The RAD 2000 Orgone Radionics Device
3.1. General Description
The new RAD 2000 is an expansion of the EPG 1100 ET: It is the
EPG 1100 ET with a stick pad and a three-knob tuner added (see below).
The tuner allows the setting of equivalent structural links either to a
target or to a desired effect (trend), or to a combination of the two.
The tuner has three potentiometers with dials, each of which
has settings ranging from 0 to 100. This allows one million settings
of the device.
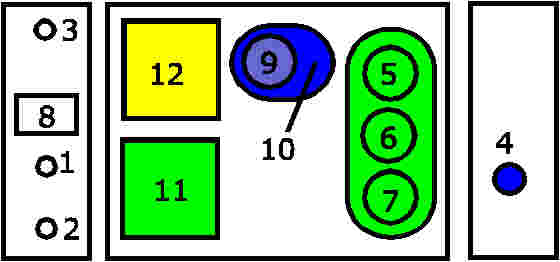
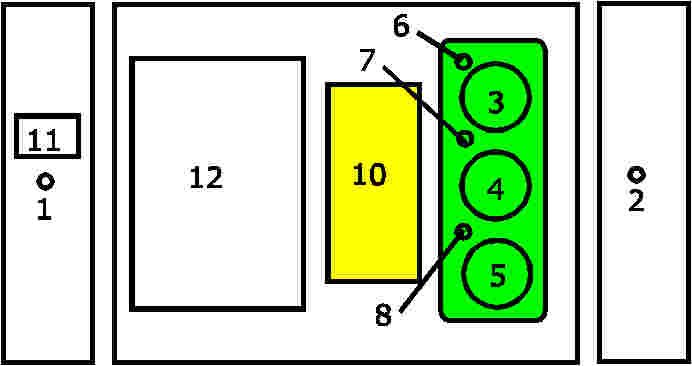
(1) Power Jack: For a 12V wall transformer
(2) Input Jack
For an exterior well or to connect with a second radionics device
(3) Output Jack
For an exterior stick pad or to connect with another device.
(4) Output Pipe
To double the power, slide a power booster over the output pipe.
(5), (6), and (7) Three knobs of the tuner
Shows the setting of the rate (equivalent structural link)
(8) On-Off Switch
To turn the device on/off
(9) Frequency Knob
You may use the stick pad to get the right setting.
(10) LED
Blinks at the speed of the frequency of the pulse unit.
(11) Well
Stainless Steel sheet onto which you put the “witness”, or probe.
(12) Stick Pad
Orgonite sheet designed to help you find the rate (equivalent structural
link) for your operation.
3.3. Operation of the RAD 2000
3.3.1. Setting Up:
The machine is ready for use as is.
3.3.2. Setting of the Rate:
The radionics rate is a structural representation of a trend
energy field, a place, a person, or a substance. It is a specific
setting of the three tuner-dials on the RAD 2000.
To get a rate reading you need to first put a sample into the
WELL (the metal plate of the new RAD 2000) . The sample represents
the target for which you intend to establish a radionic rate. We
call this sample also a Structural Link.
You set the rate in the following way: Turn the left knob of
the device while you are rubbing the stick pad (the area in front of the
three knobs) with the thumb or one of the fingers of the other hand.
Whenever the finger (or thumb) notices a “stick,” rubbing, etc., you know
that you have the correct setting of the knob. Proceed to the middle
knob and then to the right knob. Then fine-tune each of the settings
by rechecking and doing very little turns only. Eventually look for
a “stick” without turning the knobs. If you get this final “stick”
then you know that the setting is right.
Important: It is helpful to establish a rate book.
Write the radionic rates (settings) that you establish into this book.
This way you save yourself the work of establishing a specific rate every
time you set your machine.
It is good to check from time to time if the rate that you have
set on the device originally is still valid. This is especially important
when you do some work on a person. The nature of the most useful
energy to transmit from your radionics device may change as the desired
effects take place step by step. Another type of energy requires
another rate setting.
Note: We found that some persons worried about getting
the “right” rate. It is our opinion that the process of establishing
the rate will lead to the right rate.
3.4.3.
Targeting Example: Success in Business.
(1) Write on a piece of paper: The best trends to happen for person
... (write name here) to gain long lasting success in the business of ...
(describe the nature of the business). This is your “witness.”
Of course, it will be useful to specify more where indicated. On
the other hand, if your goal is to get good opportunities and to seize
the best one, then you keep it more general.
(2) Put the piece of paper onto the well of the RAD 2000.
(3) Establish the rate for the wish and keep this setting on the RAD
2000.
(4) Write the rate into the rate book for future reference (if you
decided to have a rate book).
(5) Put a structural link to the target person (such as a photo) on
top of the stick pad of the RAD 2000.
(6) Set the speed of the pulse in the EPG using the stick pad of the
RAD 2000.
Hint: Two Radionic Devices are better than one. Using
a patch cable, connect the input jack of one device with the output jack
of the other. One radionic device represents the target, while the
other one represents the energy that you send. The RAD 2400 DL is
a combination of two radionics devices.
What has been said above is also valid for all other radionics devices:
the RAD 2400 DL and the RAD 2400 HDS
4. The RAD 2400
DL
The RAD 2400 DL has two tuners, one for the target and the other
for the trend. Furthermore, its pulse generating unit is of the LPOM
(Low Pulse Orgone Module) type. This allows six pre-set frequencies
besides the frequency knob as you find it on the EPG 1100 ET and the RAD
2000. Both, the stick pad and the well are connected to both tuners.
The pre-set low frequency option allows this extraordinary device to exhibit
all the features of a mind machine, and then some!
To understand the versatility of this device better, read the
following about
Low Pulse Orgone Modules and Brain Frequencies
The LPOM (Low Pulse Orgone Module), when attached to any EPU,
will cause the EPU to exhibit all the features of a mind machine, and then
some! The orgone generator inside every RAD 2400 device is powered
by an LPOM!
You may be familiar with the beneficial effects of extreme low
frequencies (ELF) when produced by the conventional type of mind machines.
In such a case, the ELF (extreme low frequencies) are either transmitted
as light signals to the eye, as sound to the ear, or applied directly to
the brain as slight electric shocks. This means that the ELF’s are
first perceived by sensory organs through the goggles, earphones, and ear
clips of the mind machine. The brain will then slowly adjust to that
frequency input by adjusting its own frequency (brain wave) to it.
We have found that the technology of the Welz Chi Generator has
decisive advantages over the conventional type mind machines. The
reasons for that are obvious. The Welz Chi Generator can be set to
emit Low Pulse Orgone (LPO, orgone, or Chi, with a low frequency of pulse)
in the exact frequency of brain waves: Alpha, Beta, Theta, or Delta.
When you are in a field of LPO, your brain can adjust almost instantly
to that frequency. This is so, because the detour over sensory perceptions
or questionable mini-electroshocks is no longer necessary. Therefore
LPO technology can make your ELF-practice more thorough, more effective
and more time saving. Another significant advantage of the LPO technology
over conventional type mind machines is the fact that you can project LPO
at any distance with any type of structural link such as the transfer disk
of the PBT 2000 or EPU 2400 CT. There is no need for you to have
those cumbersome and ridiculous goggles and earphones on your head ever
again! You run your LPO Module in the desired brain wave frequency
and feed it into an EPG. To gain the benefit of LPO, all you need
to do is carry a structural link (such as the transfer disk of the PBT
2000) on you. You may relax or go about your usual business at any
place. You certainly would be unable to do this with earphones and
goggles on your head!
The LPOM is an expanded interior module for any EPU!
The left dial of the LPOM offers a selection of six settings
for the following exact brain wave frequencies:
Position ELF Effect
1 3.5 Super Learning, especially of languages
2 6.3 Super Learning and to boost the memory
3 7.83 Earth Resonance! invention, creativity, ESP
4 7.0 Enhance ESP (Extra Sensory Projection)
5 12.0 Centering yourself
6 14.1 Earth Resonance -- logical thinking, persuasion
The seventh setting switches over to the right dial with continuous
settings between 0.5 and 900 Hz: same as the RAD 2000 and EPG 1100 ET!
Diagram of the RAD 2400 DL:
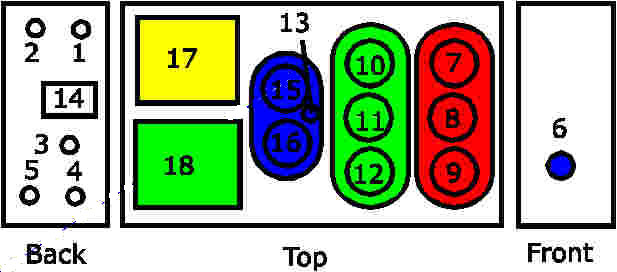
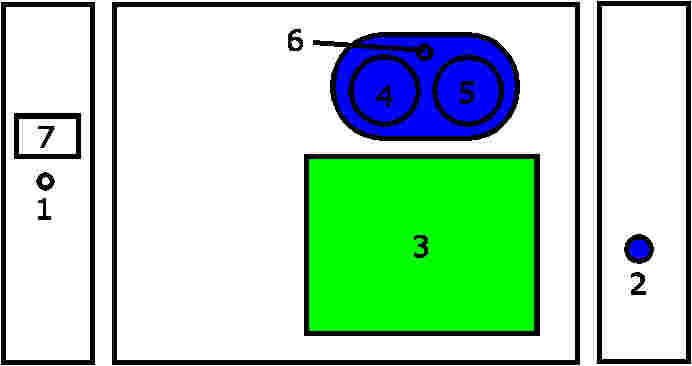
Back Panel:
(1) Output Jack on Top
Connects to the stick pad and top tuner (the tuner dials that are closer
to the edge)
(2) Output Jack on Bottom
Connects to the stick pad and bottom tuner (the tuner dials that are
between top tuner dials and LPO dials)
(3) Power Input
Use a 12V AC-DC wall transformer.
(4) Input Jack on Top
Connects to well and top tuner
(5) Input Jack on Bottom
Connects to well and bottom tuner
Front Panel
(6) Output Pipe
Top
(7), (8), and (9) three knobs of the top tuner
(10), (11), and (12) three knobs of the bottom tuner
(13) LED (light emitting diode)
(14) Switch
(15) Rotary Switch
Positions 1 through 6 are for fixed frequencies (see above), position
7 switches through to the right dial (16)
(16) Potentiometer. You can use it to set pulse speed only when
the rotary switch (15) is set on position 7.
(17) Stick pad
(18) Well
The RAD 2400 HD is built similar to the RAD 2400 DL. It has two
tuners, one for the target and the other for the trend. Furthermore,
its pulse-generating unit is of the LPOM (Low Pulse Orgone Module) type.
This allows six pre-sd into the corresponding pulse of life force (chi), thus adding
directly the structural pattern of a trend, target, or both, to the output
of the chi generatoop tuner
(5) Input Jack on Bottom
Connects to well and bottom tuner
Front Panel
(6) Output Pipe
Top
(7), (8), and (9) three knobs of the top tuner
(10), (11), and (12) three knobs of the bottom tuner
(13) LED (light emitting diode)
(14) Switch
(15) Rotary Switch
Positions 1 through 6 are for fixed frequencies (see above), position
7 switches through to the right dial (16)
(16) Potentiometer. You can use it to set pulse speed only when
the rotary switch (15) is set on position 7.
(17) Stick pad
(18) Well
The RAD 2400 HD is built similar to the RAD 2400 DL. It has two tuners, one for the target and the other for the trend. Furthermore, its pulse-generating unit is of the LPOM (Low Pulse Orgone Module) type. This allows six pre-set frequencies besides the frequency knob as you find it on the EPG 1100 ET and the RAD 2000. The stickpad is connected to both tuners, while each tuner has its well. The difference is the built-in orgone generator. It is of the EPU 2200 HDS-type, i.e., it is at least six times the power of the unit inside the RAD 2400 DL. Furthermore, the RAD 2400 HD has two transfer disks that connect with the built-in orgone generator.
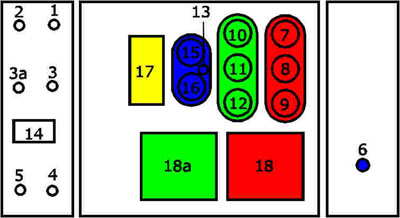
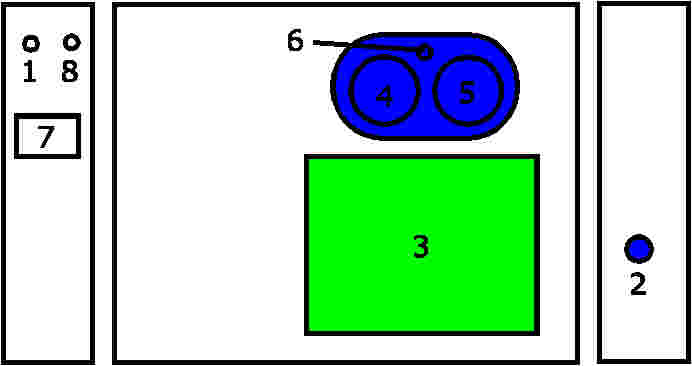
Back Panel:
(1) Output Jack on Top: Connects to the stick pad and top tuner
(2) Output Jack on Bottom: Connects to the stick pad and bottom
tuner
(3) Power Input: Use a 12V AC-DC wall transformer.
(3a) Input for additional exterior pulse generator such as the ESM
2000 Exterior Standard Module. This adds strength to the heavy-duty
orgone generator EPU inside the radionics device.
(4) Input Jack on Top: Connects to top well (18) and top tuner
(5) Input Jack on Bottom: Connects to bottom well (18a) and bottom
tuner
Front Panel
(6) Output Pipe
Top
(7), (8), and (9) three knobs of the top tuner
(10), (11), and (12) three knobs of the bottom tuner
(13) LED (light emitting diode)
(14) Switch
(15) Rotary Switch
Positions 1 through 6 are for fixed frequencies (see above), position
7 switches through to the right dial (16)
(16) Potentiometer. You can use it to set the pulse speed only
when the rotary switch (15) is set on position 7.
(17) Stick pad
(18) Well for top tuner
(18a) Well for bottom tuner
Follow your preference as to which tuner you use for the trend
and which one you use for the target.
